DIY Clamp and Ball-Head Mount
How to Build a Solid, Easily Adjustable Clamp and Ball-Head Mount
The mount is really very easy to make, but if you want to save yourself the effort, I sell one fully assembled for $30.
Starting Materials:
I've tried a number of different small clamps and ball-heads. Most didn't work very well, some of them actually broke while I was sailing my blokart®.
The clamp and ball-head shown below are the best I've found in the inexpensive catagory.
You can find both of them on E-Bay pretty easily, although you will have to specifically
search for "Osrso FRT-03" to find the few sellers who carry it. A good search for the clamp
seems to be "handlebar camera clamp", although you will probably have to scroll down past some
cheaper items to find the one shown below.
The ball-head is usually $8.00 and you can almost always find the clamp for under $5.00.


Step 1: Remove the cheap position adjuster from the clamp
First, unscrew the knob holding the top piece of the adjuster.
Pull the screw out and pull the top piece off:
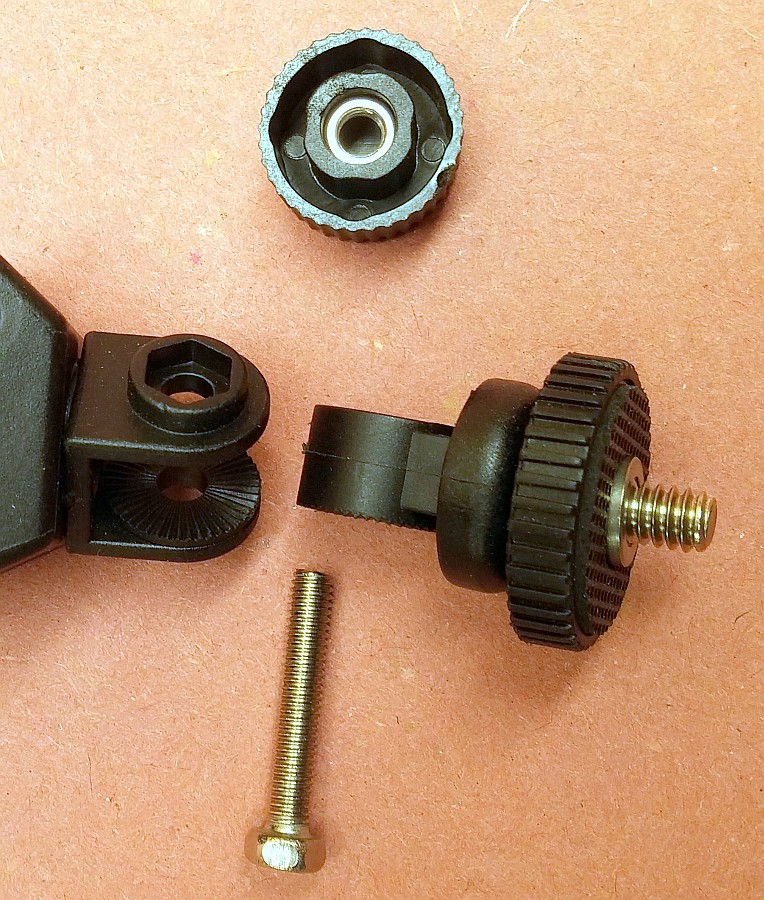
Next, remove the screw holding the lower part of the adjuster from the clamp body:


Step 2: Drill a hole into the clamp for the 1/4-20 stud
Now you need to drill a 1/4" hole through the place where the old adjuster attached to the clamp.
It's made a bit tricky since there is a stub sticking up exactly where you need to drill.
The photo below shows a drill bit; I've started using a spiral end-mill (the same one shown in the
next step). I don't think it critical which one to use.
I've always used a drill-press and vice to hold everything steady. You might be able to use a hand-drill.

Step 3: Remove the material inside the clamp to make room for the nut
This is the trickiest part of the whole process.
With the 1/4" hole drilled through the body of clamp, there are two pieces of plastic inside the clamp body that need to be partially removed to make room for a nut inside the clamp:

I prefer to use the drill-press and a 1/4" end-mill (often it's already in the drill-press from the last step). However, to do that you need to disassemble the two pieces that make up the clamp.

That's not difficult (the pivot pin holding the two pieces together presses out very easily), but I've found it impossible to remove the cap nut on the end of the threaded piece that adjust the clamp width on a few clamps.

If you can't unscrew the treaded rod (or if you don't have a drill-press and end-mill), you can push out the hinge pin and swivel the small part of the clamp out of the way and use a Dremel® tool, or something similar, to remove the excess plastic by hand.
What you want is an end-result that looks like this:
NOTE: you actually want the stud to be a even with the top of the nut to avoid interfering with the
threaded rod that adjusts the clamp; this one is protruding a bit more than desirable.


These days I fill in the spaces beside the nut with hot-glue, although my protoype doesn't have that and it's been holding up very well.
Step 3: Secure the stud in place
Once you have the lenght of the stud correct so it will thread into the ball-head and not interfere with the operation of the clamp, I always clean the stud and apply some thread locker before threading it into the nut for the last time.
Once the thread locker is cured, I fill the cavity around the stud on the top of the clamp with hot glue.
While the glue is still liquid, I put a lightly oiled or greased fender-washer on the stud and screw it down with a nut.
You need to do this pretty quickly.
Once the glue is cool, you can remove the washer (the grease is there to act as a release agent) and
trim off any excess glue. There shouldn'e be much, since the washer usually forces the excess down past the
stud into the lower body of the clamp.
You may need to trim some the excess so the hinge pin will fit in and the clamp will operate correctly.
Again this isn't necessary, but it increases the stability of the stud in the clamp.

Final Assembly:
The final step is to reassemble the clamp and the screw the ball-head down on the stud tight
against the top of the clamp.
I usually put some thread locker on the stud and on the top of the ball-head to prevent the ball-head
and GoPro mount from coming unscrewed while I'm sailing, but that's optional.
